Save
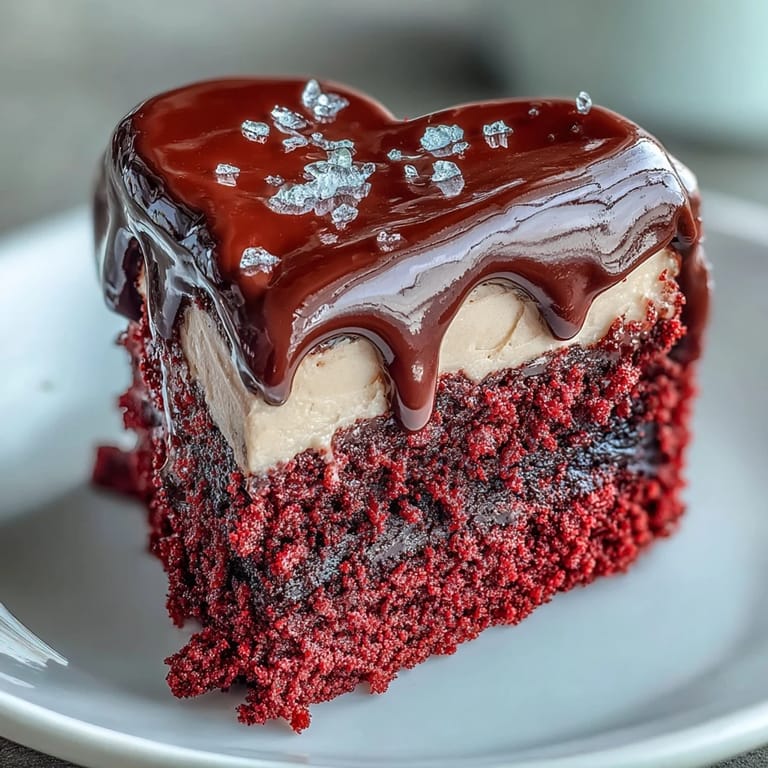
Save My daughter spotted a vintage Betty Boop mug at a yard sale and begged me to make something Betty-themed for her birthday. I had never shaped a cake into a heart before, let alone piped a chocolate silhouette, but the challenge sounded fun. The kitchen smelled like cocoa and vanilla for hours, and when I peeled that dark chocolate Betty off the parchment, perfectly intact, I felt like I'd won a baking contest. She squealed when she saw it, and honestly, so did I.
I made this for a Valentines party once, and people kept asking if I ordered it from a bakery. The truth is, the hardest part was waiting for the chocolate to set without peeking every two minutes. When I finally placed that silhouette on top, it felt like the cake came to life. Everyone wanted a slice with a piece of Betty on it, so I ended up piping extra chocolate shapes on parchment just to keep up with demand.
Ingredients
- Cake flour: Sifting it creates that soft, tender crumb that makes red velvet so delicate and light.
- Natural unsweetened cocoa powder: Just enough to give a hint of chocolate without overpowering the red color or tangy buttermilk flavor.
- Baking powder and baking soda: The duo that gives the cake its rise, and the vinegar activates the soda for extra fluffiness.
- Fine sea salt: Balances the sweetness and enhances the cocoa and vanilla notes.
- Unsalted butter (room temperature): Creaming it with sugar creates air pockets that make the cake light, so dont skip the softening step.
- Granulated sugar: Sweetens and helps create structure, and beating it with butter builds volume.
- Large eggs (room temperature): Cold eggs can deflate your batter, so let them sit out for 20 minutes before mixing.
- Buttermilk (room temperature): Adds moisture and tang, and the acid reacts with baking soda for a tender crumb.
- Red gel food coloring: Gel is more concentrated than liquid, so you get vibrant color without thinning the batter.
- Pure vanilla extract: Deepens the flavor and makes the whole kitchen smell like a bakery.
- White vinegar: Reacts with baking soda to create lift and brighten the red color.
- Cream cheese (room temperature): The base of the frosting, and it must be soft or youll get lumps no amount of mixing will fix.
- Powdered sugar (sifted): Sifting prevents gritty frosting and makes it silky smooth.
- Dark chocolate or candy melts: Melts cleanly and sets firm, perfect for piping delicate shapes that hold their structure.
- Parchment paper: The secret to peeling off chocolate shapes without breaking them.
- Betty Boop stencil: Print one online or draw your own, it doesnt have to be perfect to look adorable.
Tired of Takeout? 🥡
Get 10 meals you can make faster than delivery arrives. Seriously.
One email. No spam. Unsubscribe anytime.
Instructions
- Prep your pans:
- Preheat the oven to 350°F (175°C), then grease two 9-inch heart-shaped pans and line the bottoms with parchment. This prevents sticking and makes unmolding so much easier.
- Mix the dry ingredients:
- Whisk together cake flour, cocoa powder, baking powder, baking soda, and sea salt in a medium bowl. Set it aside while you cream the butter.
- Cream butter and sugar:
- Beat room-temperature butter in a stand mixer for 1 minute until creamy, then gradually add sugar and beat for 2 to 3 minutes until light and fluffy. Scrape down the bowl so nothing hides on the sides.
- Add eggs one at a time:
- Beat each egg on low speed just until blended, scraping the bowl between additions. Overmixing here can deflate the batter.
- Stir in color and flavorings:
- Add red gel food coloring, vanilla extract, and white vinegar, mixing until the batter is evenly colored and vibrant. The vinegar might smell sharp, but it fades completely when baked.
- Alternate dry and wet:
- With the mixer on low, add one-third of the dry ingredients, then half the buttermilk, mixing just until incorporated. Repeat with another third of dry ingredients, remaining buttermilk, and finish with the last third of dry ingredients.
- Activate the baking soda:
- In a small cup, combine 1 teaspoon vinegar with baking soda, then gently fold into the batter. It will foam slightly, which creates a light, airy crumb.
- Bake the cakes:
- Divide the batter evenly between the prepared pans and smooth the tops with an offset spatula. Bake on the center rack for 25 to 30 minutes, or until a toothpick inserted in the center comes out clean.
- Cool completely:
- Let cakes cool in pans for 10 minutes, then run a thin knife around the edges and invert onto wire racks. Remove parchment and cool completely before frosting.
- Make the frosting:
- In a clean mixer bowl, beat cream cheese and butter on medium speed for 2 minutes until smooth. Gradually add sifted powdered sugar and a pinch of salt, then vanilla extract, beating on low until combined and fluffy.
- Level and layer:
- If desired, level cake domes with a serrated knife, then place one heart layer on a cake board or plate. Pipe or spread about three-quarters cup of frosting over the top, add the second layer, and press gently.
- Crumb coat and chill:
- Apply a thin crumb coat of frosting over the entire cake, then refrigerate for 10 minutes. Add a final smooth layer of frosting, using an offset spatula to create swirls or leave it smooth.
- Pipe the chocolate silhouette:
- Place the printed stencil under a sheet of parchment, then pipe or brush melted dark chocolate over the outline. Allow the chocolate to fully set at room temperature or in the refrigerator for 10 minutes.
- Apply the silhouette:
- Carefully peel the chocolate shape from the parchment and lift it onto the center of the cake. Press gently so it adheres to the frosting.
- Decorate and chill:
- Add frosting rosettes, edible glitter, or red sugar pearls around the edges if desired. Chill the cake for 30 minutes before serving to let the frosting set, and slice with a warm, clean knife for neat hearts.
 Pin it
 The first time I served this cake, my niece said it looked too pretty to eat, then proceeded to devour two slices. Watching her carefully pick up the chocolate Betty piece and nibble it separately made me realize this cake isnt just dessert, its a little edible sculpture that brings out the kid in everyone. I still have the photos from that day pinned to my fridge.
How to Get the Smoothest Frosting Finish
I used to struggle with frosting that looked bumpy and amateur until I learned the warm spatula trick. Run your offset spatula under hot water, wipe it dry, then glide it over the frosting in long, smooth strokes. The warmth melts the frosting just enough to erase lines and lumps, giving you a bakery-quality finish without a turntable or fancy tools. If you mess up a section, just rewarm the spatula and try again.
Storing and Serving Tips
This cake tastes even better the next day once the flavors meld and the frosting sets fully. Store it covered in the refrigerator for up to four days, but bring it to room temperature for 20 minutes before serving so the frosting softens and the cake regains its tender texture. If you need to transport it, chill it until the frosting is firm, then use a tall cake box to protect the chocolate silhouette from shifting or breaking.
Creative Variations and Swaps
You can swap the Betty Boop silhouette for any character or design that fits your theme, from hearts and stars to initials or cartoon faces. White chocolate dyed with oil-based black coloring creates a brighter contrast against the red frosting if you want a bolder look. I once made this with raspberry extract instead of vanilla, and the subtle fruit note paired beautifully with the cream cheese frosting.
- Try adding a layer of raspberry or strawberry jam between the cake layers for extra fruitiness.
- Use round pans if you dont have heart-shaped ones, the silhouette still looks adorable on a classic circle.
- Dust the top with edible shimmer or red sanding sugar for a festive sparkle.
 Pin it
 This cake has become my go-to for birthdays and celebrations, and every time I peel that chocolate silhouette off the parchment without a crack, I feel like a magician. I hope it brings you as much joy as it brings everyone who sees it on the table.
Frequently Asked Questions
- → What makes the crumb so tender?
Buttermilk provides acidity that tenderizes gluten strands, while vinegar activates baking soda for extra lift. Room-temperature ingredients create proper emulsification, resulting in that signature soft, velvety texture.
- → Can I make the silhouette ahead of time?
Absolutely. Prepare the dark chocolate decorations up to a week in advance and store between parchment paper in an airtight container at room temperature. Handle gently when transferring to the frosted surface.
- → Why use gel food coloring instead of liquid?
Gel coloring delivers intense red pigment without adding excess liquid that could alter batter consistency. Liquid versions require significantly more product to achieve the same vibrant hue, potentially affecting the final texture.
- → How do I prevent layers from doming?
Heart-shaped pans distribute heat evenly, but if doming occurs, simply level with a serrated knife before stacking. The crumb coat technique hides minor imperfections and creates a professional finish.
- → Can I substitute the dark chocolate decoration?
White chocolate tinted black with oil-based coloring works well for brighter contrast. Alternatively, create silhouettes from fondant, modeling chocolate, or even printed edible paper for different visual effects.
- → What's the best way to slice clean layers?
Use a warm, clean knife—dip in hot water and wipe dry between slices. This seals the frosting as you cut, preventing dragging and maintaining those sharp heart shapes. Chill for 30 minutes before cutting for cleanest results.